Open Procore Sign-In in a Pop-Up
Run the Authorization Code flow in a pop-up window, so users sign in with Procore without leaving your page.
Overview
This is sample code, not a supported library. It shows one way to build the pattern, so review, test, and secure it before you use it in production. Procore provides it as is, without warranty or support, and may change it at any time.
This page builds on the OAuth 2.0 Authorization Code Grant Flow, so read that first. It covers only what changes when sign-in runs in a pop-up window: opening the window, and passing the result back to your page.
Use a pop-up for a Sign in with Procore button in any web app, whether it’s a standalone site or an embedded app running inside Procore. The user never leaves your page. Redirecting your whole page to Procore’s login, or loading the login page in an iframe or modal, works but is a clunky experience.
This page shows the pattern with sample code to adapt to your own stack. It replaces the Procore Iframe Helpers library (@procore/procore-iframe-helpers), which is deprecated and no longer maintained.
Before you begin. Your app version needs a Data Connector with User Level Authentication, and a redirect URI registered on the Credentials tab. See OAuth Credentials Management.
How It Works
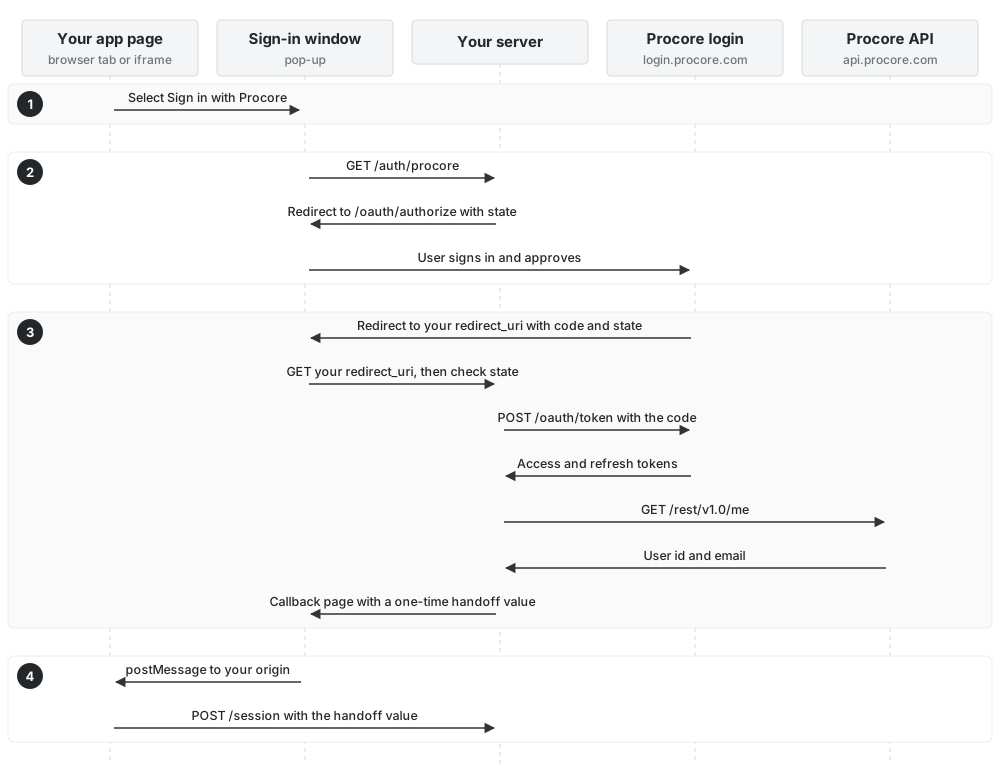
Steps 2 and 3 are the standard Authorization Code flow. The pop-up adds the Sign-in window column and step 4. The numbers match the steps on this page.
1. Add the Sign-In Button
Open the window inside the button’s click handler. Browsers block pop-ups that don’t come straight from a user action.
<button id="sign-in">Sign in with Procore</button>
<p id="status"></p>

<script>
  let authWindow;
  let monitor;

  document.getElementById('sign-in').addEventListener('click', () => {
    // A second click brings the open window forward instead of starting over.
    if (authWindow && !authWindow.closed) {
      authWindow.focus();
      return;
    }

    authWindow = window.open('/auth/procore', 'procore-sign-in', 'popup,width=560,height=600');
    if (!authWindow) {
      document.getElementById('status').textContent = 'Allow pop-ups to sign in with Procore.';
      return;
    }

    // Treat a window the user closes as a canceled sign-in.
    clearInterval(monitor);
    monitor = setInterval(() => {
      if (authWindow.closed) {
        clearInterval(monitor);
        document.getElementById('status').textContent = 'Sign-in was canceled.';
      }
    }, 500);
  });
</script>
2. Start Authorization on Your Server
This is step 1 of the Authorization Code flow, run inside the pop-up. The window opens a route on your own domain. That route redirects to Procore’s authorize endpoint with your Client ID, redirect URI and a random state value. The example assumes session middleware, such as express-session, and Node’s crypto module.
// Express example
app.get('/auth/procore', (req, res) => {
  const state = crypto.randomBytes(16).toString('hex');
  req.session.oauthState = state;

  const params = new URLSearchParams({
    client_id: process.env.PROCORE_CLIENT_ID,
    response_type: 'code',
    redirect_uri: process.env.PROCORE_REDIRECT_URI,
    state,
  });
  res.redirect(`https://login.procore.com/oauth/authorize?${params}`);
});
3. Handle the Callback
This covers steps 2 and 3 of the Authorization Code flow. Procore redirects the window to your redirect URI with code and state in the query string. On your server, check state, exchange the code for tokens, and keep the tokens server-side.
Then call GET /rest/v1.0/me with the access token. It returns the user’s Procore id and email address (login), which you match to an account in your system. Match on id once an account is linked, since a user’s email can change.
Finally, render a small page that posts the result to your page. Send a short-lived, single-use handoff value, never the Procore access token.
app.get('/auth/procore/callback', async (req, res) => {
  const expectedState = req.session.oauthState;
  delete req.session.oauthState; // Each state value works once
  const stateMatches = Boolean(req.query.code && expectedState) && req.query.state === expectedState;
  let status = 'failure';
  let handoff = null;

  if (stateMatches) {
    try {
      const tokens = await exchangeCodeForTokens(req.query.code); // POST /oauth/token
      const user = await getProcoreUser(tokens); // GET /rest/v1.0/me
      handoff = await createHandoff(user); // Your own short-lived, single-use value
      status = 'success';
    } catch (error) {
      console.error('Procore sign-in failed', error);
    }
  }

  const message = { type: 'procore-sign-in', status, handoff };
  res.send(`<script>
    window.opener.postMessage(${JSON.stringify(message)}, '${process.env.APP_ORIGIN}');
  </script>`);
});
exchangeCodeForTokens, getProcoreUser and createHandoff stand in for your own code. For the token request and refresh, see OAuth 2.0 Authorization Code Grant Flow.
4. Receive the Result on Your Page
Listen for the message on the page from step 1. Accept it only from your own origin and your own sign-in window, then close the window.
window.addEventListener('message', async (event) => {
  if (event.origin !== window.location.origin || event.source !== authWindow) return;
  if (event.data?.type !== 'procore-sign-in') return;

  clearInterval(monitor);
  authWindow.close();

  if (event.data.status !== 'success') {
    document.getElementById('status').textContent = 'Sign-in failed. Try again.';
    return;
  }

  // Trade the handoff value for a session that belongs to this page.
  await fetch('/session', {
    method: 'POST',
    credentials: 'include',
    headers: { 'Content-Type': 'application/json' },
    body: JSON.stringify({ handoff: event.data.handoff }),
  });
  window.location = '/main';
});
Your /session route redeems the handoff value once and sets your session cookie. In a standalone app, the session the sign-in window set is already shared with your page, so you can skip the handoff and reload the page instead.
Inside Procore’s iframe, use the handoff value. Browsers that block third-party cookies keep the sign-in window’s cookies separate from the iframe’s, so set the iframe’s own cookie with
SameSite=None,SecureandPartitioned.